Building, Testing, and Contributing
Testing Latest Commits on HEAD
There are several ways to use DDEV’s latest-committed HEAD version:
ddev utility download-ddev: Runddev utility download-ddev --headto download the latestmainbuild into~/tmp/ddev-download-ddev/main. It prints how to use the new binary in your current shell.- Download the latest
mainbranch artifacts from nightly.link. Each of these is built by the CI system, signed, and notarized. Get the one you need and place it in your$PATH. - Homebrew install HEAD: On macOS and Linux, run
brew unlink ddev && brew install ddev/ddev/ddev --HEAD --fetch-HEADto get the latest DDEV commit, even if it’s unreleased. -
Install via script: You can download and run the install_ddev_head.sh script, or run it automatically:
-
Build manually: If you have normal build tools like
makeandgoinstalled, you can check out the code and runmake.
Testing a PR
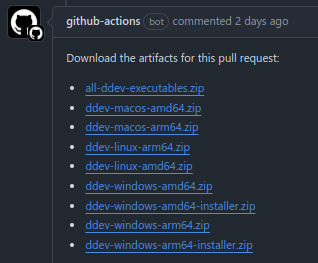
Each PR build creates GitHub artifacts you can use for testing. The easiest way is ddev utility download-ddev, described first below; you can also download the artifact you need from the PR page manually and install it yourself.
You can also downgrade to an older version of DDEV (perform a rollback).
Downloading a build with ddev utility download-ddev
ddev utility download-ddev downloads the ddev and ddev-hostname binaries for a build and prints how to use them in your current shell:
# Download this PR's build for your current OS and architecture into ~/tmp/ddev-download-ddev/pr-<PR_NUMBER>
ddev utility download-ddev --pr <PR_NUMBER>
# See the help for more options:
ddev utility download-ddev --help
It can also fetch builds by branch, commit, release tag, or main HEAD, and cross-download other platforms.
Downloading a build manually
Normally, you can put any executable in your path, and it takes precedence, so you don’t need to remove or disable an already installed DDEV instance, which we will use here. This example uses ~/bin. Since not every OS has $HOME/bin in $PATH, you can create the folder and add it to your path by updating ~/.bashrc, ~/.zshrc, or another relevant shell configuration file with these commands:
mkdir ~/bin
echo 'export PATH="$HOME/bin:$PATH"' >>~/.bashrc
source ~/.bashrc
# Verify that `$HOME/bin` is the first entry in your `$PATH`
echo $PATH
Download a ZIP file for your OS and architecture by clicking the link (the result is something like ddev-macos-arm64.zip) or using wget, curl, dl and unzip it, make it executable, and move it to the ~/bin folder:
Tip: If you need a zip-file to try out the “Testing a PR” process, see the nightly builds.
macOS and Unsigned Binaries (click me)
macOS doesn’t like these downloaded binaries, so you’ll need to bypass the automatic quarantine to use them:
(The binaries on the main branch and the final release binaries are signed.)
Verify the replacement worked by running ddev -v. The output should be something like ddev version v1.23.5-98-g3c93ae87e, instead of the regular ddev version v1.23.5. Valuable commands for debugging are which -a ddev and echo $PATH.
When DDEV detects a version change, it recommends powering down all running containers. Then, it will download the new images, if required.
After you’re done testing, you can delete your downloaded executable, restart your terminal, and again use the standard DDEV:
Making Changes to DDEV Images
If you need to make a change to one of the DDEV images, just edit the files under that image’s directory (for example containers/ddev-webserver/Dockerfile), then build from the repository root:
make detects that the image’s own content changed, builds it locally for your host architecture, and automatically rewrites the matching tag (like WebTag) in pkg/versionconstants/versionconstants.go — there’s no tag to invent and no file to hand-edit. If nothing under containers/ changed, make does nothing extra: no Docker calls, no network access.
This also applies after a rebase or merge — if a base image or shared file changed upstream, make detects the mismatch and rebuilds the affected image the same way, even if you didn’t edit anything yourself.
ddev version should show you that you are using the freshly built tag, and ddev start will use the local image without pulling.
Run make print-image-tags at any time to see the tag each image would currently use, whether or not it’s actually been built yet — this is the value to use with the GitHub Actions push workflows described below if you need the image pushed to the registry.
containers/ddev-dbserver is a special case: one tag (BaseDBTag) covers many db type/version combinations, so make only builds the default variant (currently mariadb_11.8) locally. To build a different db type/version after changing containers/ddev-dbserver, build it manually using the tag make print-image-tags reports:
Docker Image Changes
Running make at the repository root (above) already builds a changed image locally and updates pkg/versionconstants/versionconstants.go for you. To make that same build available to CI or other developers, it also needs to be pushed to the registry:
- Get the exact tag
makeused, withmake print-image-tags(or read it straight out ofpkg/versionconstants/versionconstants.goafter runningmake). - Push an image with that tag by navigating to the image directory (like
containers/ddev-webserver), and runningmake push DOCKER_REPO=youruser/yourimage VERSION=<tag>. - Multi-arch images require you to have a Buildx builder, so
docker buildx use multi-arch-builder || docker buildx create --name multi-arch-builder --use. - You can’t push until you
docker login. - Push a container to hub.docker.com with that same tag. Push to
<yourorg>/ddev-webserverrepository withmake push DOCKER_ORG=<yourorg> VERSION=<tag>in the container directory. You might have to use other techniques to push to another repository.
Local Builds and Pushes
To use buildx successfully you have to have the buildx Docker plugin, which is in many environments by default.
To build multi-platform images you must docker buildx use multi-arch-builder || docker buildx create --name multi-arch-builder --use as a one-time initialization.
-
Running
makefrom the repository root already does a quick local build of any changed image for your host architecture (see Making Changes to DDEV Images above). To build a specific image or db type/version directly instead, you can still:cd containers/<image>thenmake VERSION=<version>- for
ddev-dbserver:make mariadb_10.3 VERSION=<version>etc.
-
To push manually:
If you’re pushing to a repository other than the one wired into the Makefile (like ddev/ddev-webserver):
Pushes Using GitHub Actions
Normally the Image build workflow (see Automatic Image Build and Push) handles pushing a changed image automatically for any pull request, including forks. The workflows below are for manually pushing a specific tag — a re-push, or one of the ddev-dbserver variants other than the default mariadb_11.8 that make auto-builds.
To manually push using GitHub Actions,
For Most Images
- Visit Actions → Push tagged image
- Click “Run workflow” in the blue band near the top.
- Choose the branch, usually
mainand then the image to be pushed,ddev-webserver,ddev-dbserver, etc.
For ddev-dbserver
- Visit Actions → Push tagged db image
- Click “Run workflow” in the blue band near the top.
- Choose the branch, usually
main. Include a tag for the pushed image and GitHub will do all the work.
Instrumentation
The instrumentation implementation is generated using the Ampli Codegen.
To synchronize the implementation with the latest changes at Amplitude, the CLI tool has to be installed locally:
Make changes to the event definition using the GUI at https://data.amplitude.com/ddev/DDEV:
- create a new branch
- create or change events and properties
- save changes to the new branch
- update the implementation with
ampli checkout <branch name> - make changes to the code
Once finished, save the changes to publish a new version of the definitions.
Afterwards the changes can be imported running the following command in the project root:
Once the changes are ready to be merged, merge the changes made in the new
branch to the main branch in the Amplitude backend (the Merge button is on the Activity tab on the left) and switch back to the
main branch:
Make sure the API keys are not included to the sources; they are linked during compilation using a GitHub secret.
Environments
There are two environments defined, DDEV - Production and DDEV - Development.
Master builds will deliver the data to production, PR builds to development.
When working on Amplitude, please always make sure the correct environment is selected or you won’t see any data. Selection is possible on most pages.
User and event data
The first step is always to identify the device, this includes data like OS, architecture, DDEV version, Docker, etc., details are visible in the User Properties. The devices are called Users in the Amplitude backend. So every user represents an unique device on which DDEV is installed.
The second step is to collect data about the command which was called by the
user and is delivered by a dedicated Command event.
The Project event finally collects data about the loaded project(s) which
includes important configuration details like PHP version, database, etc.
Debugging
Information about data debugging can be found at https://www.docs.developers.amplitude.com/data/debugger/. Ingestion debugger or via User lookup are the most useful options for DDEV.
Don’t forget to select the matching environment while debugging.
Examining data on Amplitude.com
First, local ddev binaries have to be built with AmplitudeAPIKey set. Visit https://app.amplitude.com/data/ddev/DDEV/sources/production and select either “Production” or “Development”, then click the “Go SDK” line to get the API key. Then set export AmplitudeAPIKey=<key> and build the binaries with make.
Then run ddev commands as usual, and the data will be sent to Amplitude.
- You can examine data on the local side with
export DDEV_VERBOSE=truebut it’s awkward. However, the actual data is always marked withAMPLITUDE:and theEventTypewill beCommand,Project, or$identify(User data). For example, DDEV_VERBOSE=true ddev start 2>&1 | grep AMPLITUDE` - To see the data show up on Amplitude, you’ll need to
ddev utility instrumentation flush. - To make it easier to find your data, use the “Development” key and set your
instrumentation_userto a familiar value in$HOME/.ddev/global_config.yaml. For example,instrumentation_user: rfaywould make it so you can find the userrfay. - To inspect data, visit “User Lookup”, (
https://app.amplitude.com/analytics/ddev/activity) and choose the correct source in the upper left (“DDEV Production” or “DDEV Development”). Then use “Search users” in the upper right to find the user you are studying. If you’ve used aninstrumentation_userit will be searchable as “User”. (Advanced->where: “User” = “rfay”. for example). You’ll then have a page devoted to the events of that user.
Building
- You’ll want both your fork/branch and the upstream as remotes in Git, so that tags can be determined. For example, the upstream Git remote can be
https://github.com/ddev/ddevand your fork’s remote can begit@github.com:<yourgithubuser>/ddev. Without the upstream, Git may not know about tags that it needs for tests to work. - To run tests, you’ll want
~/tmpto be allowed in Docker. This is not normally an issue as the home directory is available by default in most Docker providers.
Build the project with make and your resulting executable will end up in .gotmp/bin/linux_amd64/ddev or .gotmp/bin/linux_arm64/ddev (for Linux) or .gotmp/bin/windows_amd64/ddev.exe or .gotmp/bin/windows_arm64/ddev.exe (for Windows) or .gotmp/bin/darwin_amd64/ddev or .gotmp/bin/darwin_arm64/ddev (for macOS).
You can add additional go build args with make BUILDARGS=<something>, for example, make BUILDARGS=-race.
Build/test/check static analysis with:
make # Builds on current os/architecture
make BUILDARGS=-race
make linux_amd64
make linux_arm64
make darwin_amd64
make darwin_arm64
make windows_amd64
make windows_arm64
make test
make clean
make staticrequired
Testing
Normal test invocation is make test. Run a single test with an invocation like go test -v -run TestDevAddSites ./pkg/... or make test TESTARGS="-run TestDevAddSites". The easiest way to run tests is from inside the excellent Go IDE GoLand. Click the arrowhead to the left of the test name. This is also easy to do in Visual Studio Code.
To test with race detection, make test TESTARGS="-race" for example.
To see which DDEV commands the tests are executing, set the environment variable DDEV_DEBUG=true.
Use GOTEST_SHORT=true to run one CMS in each test, or GOTEST_SHORT=<integer> to run exactly one project type from the list of project types in the TestSites array. For example, GOTEST_SHORT=5 make test TESTARGS="-run TestDdevFullSiteSetup" will run only TestDdevFullSiteSetup against TYPO3.
To run a test (in the cmd package) against a individually-compiled DDEV binary, set the DDEV_BINARY_FULLPATH environment variable, for example DDEV_BINARY_FULLPATH=$PWD/.gotmp/bin/linux_amd64/ddev make testcmd.
To run all tests in a specific package, use make testonepkg TESTPKG=./pkg/dockerutil. Combine with TESTARGS to filter further, for example make testonepkg TESTPKG=./pkg/dockerutil TESTARGS="-run TestDockerUtils".
To run all tests defined in a single _test.go file, use make testonefile TESTFILE=./cmd/ddev/cmd/utility-tls-diagnose_test.go. This automatically extracts the test function names from the file and builds the -run pattern.
When triggering a custom Buildkite or GitHub Actions run, the same targets are available via environment variables: set MAKE_TARGET=testonepkg with TESTPKG=./pkg/dockerutil, or MAKE_TARGET=testonefile with TESTFILE=./cmd/ddev/cmd/utility-tls-diagnose_test.go.
The easiest way to run tests is using GoLand (or VS Code) with their built-in test runners and debuggers. You can step through a specific test; you can stop at the point before the failure and experiment with the site that the test has set up.
Automated Testing
Anybody can view the CircleCI automated tests, and they usually show up any problems that are not OS-specific. Click through on the testing section of the PR to see them.
The Buildkite automated tests require special access, which we typically grant to any PR contributor that asks for it.
Docker Image Development
The Docker images that DDEV uses are included in the containers/ directory:
containers/ddev-webserverprovides the web servers for per-projectwebcontainers.containers/ddev-dbserverprovides thedbcontainer for per-project databases.containers/ddev-ssh-agentprovides a single in-Docker-network SSH agent so projects can use your SSH keys.containers/ddev-traefik-routeris the current Traefik-based router image.containers/ddev-xhguiprovides a web interface to analyze performance profiles generated by xhprof.
When you change an image, running make from the repository root builds it locally and computes/updates its tag in pkg/versionconstants/versionconstants.go automatically — no manual tag-inventing or file-editing needed, and this works for any contributor, including from a fork. If you’d rather leave the build to CI, make retag-images writes the same tags without running Docker at all; the tags it writes then name images that exist nowhere until the pull request’s push completes, so ddev start won’t work until then. Once you push that commit as a pull request, the Image build workflow detects the changed image and builds and pushes it to the registry automatically — no maintainer needs to run anything by hand. See Automatic Image Build and Push below for when that requires a maintainer’s approval and when it doesn’t.
Automatic Image Build and Push
An image’s tag is the bare content hash of the files it’s built from — ddev/ddev-webserver:36bceca65e, with no branch prefix. The same content therefore resolves to the same tag no matter which branch, fork, or Docker Hub organization published it, which is what lets make, the CI detector, and every test runner agree without coordinating. versionconstants.go records the branch alongside it, both as a trailing comment and as a WebTagBranch-style variable that ddev version shows, and each push also publishes a readable <branch>-<hash> alias pointing at the same manifest.
Opening a pull request that touches containers/ triggers the Image build workflow. A detect job always runs first: it recomputes each image’s content hash and checks whether that tag is already in the registry. If it is, there’s nothing to build — so a pull request that touches containers/ without changing an image costs one registry lookup per image and no build.
The same resolution drives containers/wait-for-images.sh, which every test runner calls before pulling anything: it waits only for tags this commit will pull, and doesn’t wait at all for an image whose content changed, since make builds that one locally on the runner.
Changing containers/ddev-dbserver is the one case where make alone isn’t enough. Every database variant shares a single BaseDBTag, so a dbserver change moves the tag for all 20 of them at once, while make only builds the default mariadb_11.8 locally — the other 19 can only come from the registry. CI builds and pushes the whole matrix (36 jobs, from containers/ddev-dbserver/variants.txt), so run make and commit the versionconstants.go change; wait-for-images.sh stops the test run with that instruction if you don’t.
What happens next depends on whether the PR is from a fork:
- Fork PRs (security boundary — the PR could contain an arbitrary Dockerfile/build script) from someone without push access: as soon as
detectfinds an image to build, anapprovejob asks a maintainer to sign off on theimage-pushenvironment, before anything is built. Once approved, abuildjob builds the image(s) per architecture with no registry credentials at all — nothing in that job can reachdocker.io, so there’s nothing to gain by gating it after the fact instead of before. A separate, trustedimage-push.ymlworkflow — which never checks out or runs the pull request’s code — then loads whatbuildproduced and pushes it, re-validating both the tag and every repository name first (containers/validate-image-tag.sh,containers/validate-image-repo.sh) so the earlier approval can only ever publish a hash-shaped tag under a known DDEV repository. A comment is posted on the PR once the push completes. Ifdetectfound nothing to build, no approval is requested at all. - Fork PRs from a maintainer’s own fork (
author_associationisOWNER,MEMBER, orCOLLABORATOR): the same fork-safebuild/image-push.ymlsplit runs, but theapprovejob is skipped — they already have push access, so there’s nothing to ask permission for. - Everything else (a push to
main, or a pull request from a branch in the same repository — no fork content is ever involved):build-and-pushbuilds and pushes directly in one step, with no approval gate at all — the same trust levelmain-build.ymlalready runs at unguarded. Acreate-manifestsjob then assembles the multi-arch manifest and comments on the PR, if there is one.
So a maintainer only ever needs to click Approve once — as soon as a fork PR without push access changes a container image — and only that once; everything else is fully automatic.
Pull Requests
To contribute your fixes or improvements to DDEV, make a pull request on GitHub. If you’re undertaking a large change, create an issue first so it can be discussed before you invest a lot of time. When you’re ready, create a pull request, and a discussion will start around your proposed changes. Other contributors and users may chime in, but ultimately the decision is made by the maintainer(s). You may be asked to make some changes to your pull request. If so, add more commits to your branch and push them. They’ll automatically go into the existing pull request.
If your pull request is merged, great! If not, no sweat; it may not be what the project maintainer had in mind, or they were already working on it. This happens, so our recommendation is to take any feedback you’ve received and go forth and pull request again. Or create your own open source project.
Preparing a pull request
- Fork the repository and clone it locally. Connect your local to the original ‘upstream’ repository by adding it as a remote, and pull upstream changes often so you stay up to date and reduce the likelihood of conflicts when you submit your pull request. See more detailed instructions on GitHub.
- Create a branch for your edits. See below for DDEV’s conventions for branch names.
- Be clear about the problem and how someone can recreate it, or why your feature will help. Be equally clear about the steps you took to make your changes.
- It’s best to test. Run your changes against any existing tests and create new tests when needed. Whether tests exist or not, make sure your changes don’t break the existing project.
Feature branch name
When preparing your pull request, please use a branch name like YYYYMMDD_<your_username>_short_description (like 20230901_rfay_short_description) so it’s easy to identify you as the author.
Pull Request Title Guidelines
We have very precise rules over how our PR titles (and thus main-branch commits) are to be formatted. This leads to more readable messages that are easy to follow when looking through the project history. But also, we use the main-branch Git commit messages to generate the changelog for the releases.
The pull request title must follow this convention which is based on the Conventional Commits specification:
Examples
build: update Makefile logicchore(deps): bump mutagen to 0.18.1ci(pr): enforce commit message convention, fixes #5037docs: change code refs of Mac M1 to Apple Siliconfeat: allow multiple upload dirs, fixes #4190, fixes #4796feat(pantheon): use environment variablesfix: create upload_dir if it doesn't exist in ddev composer create-project, fixes #5031fix(auth): resolve password reset bug, for #1234refactor: add new Amplitude Property DDEV-Environmentperf(image-pull): use docker-compose for parallel downloadsstyle(readme): improve formattingtest: optimize caching of downloaded assets
Type
Must be one of the following:
- build: Changes that affect the build or external dependencies
- chore: Maintenance tasks, dependency updates, or other changes that don’t modify src or test files
- ci: Changes to our CI configuration files and scripts
- docs: Documentation only changes
- feat: A new feature
- fix: A bugfix
- perf: A code change that improves performance
- refactor: A code change that neither fixes a bug nor adds a feature
- style: Changes that do not affect the meaning of the code (whitespace, formatting, missing semi-colons, etc)
- test: Adding missing tests or correcting existing tests
Regarding SemVer, all types above except feat increase the patch version, feat increases the minor version.
Scope
An optional scope may be provided to add contextual information and is contained within parentheses, e.g., feat(pantheon): add file uploads. The scope should be a noun describing a section of the codebase surrounded by parentheses.
Breaking Changes
Breaking changes must have a ! appended after type/scope.
Regarding SemVer, breaking changes increase the major version.
Subject / Description
The subject contains a succinct description of the change:
- use the imperative, present tense: “change” not “changed” nor “changes”
- don’t capitalize the first letter
- no dot (.) at the end
If an issue exists for the change, , fixes #<issue number> must be appended to the subject.
Revert
If the commit reverts a previous commit, it should begin with revert:, followed by the header of the reverted commit. In the body it should say: This reverts commit <hash>., where the hash is the SHA of the commit being reverted.
Coding Style
Unless explicitly stated, we follow all coding guidelines from the Go community. While some of these standards may seem arbitrary, they somehow seem to result in a solid, consistent codebase.
It is possible that the codebase does not currently comply with these guidelines. We are not looking for a massive PR that fixes this since that goes against the spirit of the guidelines. All new contributions should make a best effort to clean up and make the codebase better than they left it. Obviously, apply your best judgment. Remember, the goal here is to make the codebase easier for humans to navigate and understand. Always keep that in mind when nudging others to comply.
Use make staticrequired to ensure that your code can pass the required static analysis tests.
The rules:
- All code should be formatted with
gofmt -s. - All code should pass the default levels of
golint. - All code should follow the guidelines covered in Effective Go and Go Code Review Comments.
- Comment the code. Tell us the why, the history and the context.
- Document all declarations and methods, even private ones. Declare expectations, caveats and anything else that may be important. If a type gets exported, having the comments already there will ensure it’s ready.
- Variable name length should be proportional to its context and no longer.
noCommaALongVariableNameLikeThisIsNotMoreClearWhenASimpleCommentWouldDo. In practice, short methods will have short variable names and globals will have longer names. - No underscores in package names. If you need a compound name, step back, and re-examine why you need a compound name. If you still think you need a compound name, lose the underscore.
- All tests should run with
go testand outside tooling should not be required. No, we don’t need another unit testing framework. Assertion packages are acceptable if they provide real incremental value. - Even though we call these “rules” above, they are guidelines. Since you’ve read all the rules, you now know that.
If you are having trouble getting into the mood of idiomatic Go, we recommend reading through Effective Go. The Go Blog is also a great resource. Drinking the kool-aid is a lot easier than going thirsty.
Contributor Live Training
We’re actively trying to increase the DDEV community of contributors and maintainers. To do that, we regularly do contributor training, and we’d love to have you come. The trainings are recorded for everybody’s benefit. The recordings and upcoming session dates can be found here: DDEV Contributor Live Training.